Installation
Serveur
Installation automatique
Avertissement
- Configuration de base à respecter avant de lancer l’installation:
- l’interface réseau est correctement configurée sur le serveur
- l’accès aux dépôts officiels est disponible
- utilisation d’un système Linux CentOS 7 ou RedHat équivalent
perlinstallé sur le système
L’installation de la solution peut se faire en utilisant le script install.sh présent dans le tar.gz.
Si les prérequis sont respectés alors l’installation se fera en mode automatique, c’est à dire que les paquets manquants
seronts récupérés automatiquement.
Exemple d’installation en mode automatique
./install.sh
Are you sure to install the product? (yes or no) yes
=========================================================
=  - Installation of the ExtensiveAutomation product -  =
=                    Denis Machard                      =
=               www.extensiveautomation.org             =
=========================================================
* Detecting the operating system (centos 7)                [  OK  ]
* Detecting the system architecture (x86_64)               [  OK  ]
* Detecting Perl, Python                                   [  OK  ]
* Detecting primary network address (XXX.XXX.XXX.XXX)      [  OK  ]
* Adding external libraries .................              [  OK  ]
* Adding external libraries .......                        [  OK  ]
* Adding interop libraries .......                         [  OK  ]
* Detecting Apache                                         [  OK  ]
* Detecting MySQL/MariaDB                                  [  OK  ]
* Detecting Postfix                                        [  OK  ]
* Detecting Openssl                                        [  OK  ]
* Detecting Php                                            [  OK  ]
* Copying source files                                     [  OK  ]
* Adding startup service                                   [  OK  ]
* Updating configuration files                             [  OK  ]
* Creating extensivetesting user                           [  OK  ]
* Updating folders rights                                  [  OK  ]
* Updating php configuration                               [  OK  ]
* Updating httpd configuration                             [  OK  ]
* Adding virtual host                                      [  OK  ]
* Restarting httpd                                         [  OK  ]
* Restarting MySQL/MariaDB                                 [  OK  ]
* Restarting postfix                                       [  OK  ]
* Adding the ExtensiveAutomation database                  [  OK  ]
* Starting ExtensiveAutomation X.X.X                       [  OK  ]
=========================================================================
- Installation completed successfully!
- Continue and go to the web interface (https://XXX.XXX.XXX.XXX/web/index.php)
=========================================================================
Exemple pour vérifier si le serveur fonctionne correctement.
xtctl status
Extensive Testing is running
Le serveur est accessible à l’adresse indiquée à la fin de l’installation. Il est possible d’utiliser les comptes de bases pour se connecter:
- utilisateur
admin- utilisateur
tester- utilisateur
monitor
Note
Les comptes par défaut n’ont pas de mot de passe.
Avertissement
Ne pas oublier de changer les mots de passe des comptes par défaut ou de désactiver les comptes.
Installation personnalisée
Avertissement
Ce mode d’installation n’est recommandé que pour les utilisateurs avancés.
Ce mode est utilisé pour changer la destination de l’installation ou spécifier certains paramètres (voir l’exemple).
Exemple d’installation en mode personnalisé (ici, la destination de xtc)
./custom.sh
=========================================================
=  - Installation of the ExtensiveAutomation product -  =
=                    Denis Machard                      =
=               www.extensiveautomation.org             =
=========================================================
* Detecting the operating system (XXXXXXXX)                [  OK  ]
* Detecting the system architecture (XXXXXX)               [  OK  ]
* Detecting Perl, Python                                   [  OK  ]
* Detecting primary network address (XX.XX.XX.XX)          [  OK  ]
* Download automatically all missing packages? [Yes]
* In which directory do you want to install the ExtensiveTesting product? [/opt/xtc/] <INSTALL_PATH>
* What is the directory that contains the init scripts? [/etc/init.d/]
* What is the external ip of your server? <IP_EXTERNE>
* What is the FQDN associated to the external ip of your server? <FQDN>
* What is the database name? [xtcXXX]
* What is the table prefix? [xtc]
* What is the ip of your mysql/mariadb server? [127.0.0.1] <IP_BASE>
* What is the login to connect to your mysql/mariadb server? [root] <LOGIN_BASE>
* What is the password of previous user to connect to your mysql/mariadb server? [] <MOTDEPASSE_BASE>
* What is the sock file of your mysql/mariadb server? [/var/lib/mysql/mysql.sock]
* Do you want to configure iptables automatically? [Yes]?
* Do you want to configure php automatically? [Yes]?
* Where is your php conf file? [/etc/php.ini]
* Do you want to configure apache automatically? [Yes]?
* What is the directory that contains the httpd conf file? [/etc/httpd/conf/]
* What is the directory that contains the httpd virtual host conf files? [/etc/httpd/conf.d/]
* What is the directory that contains the virtual host? [/var/www/]
* Do you want to configure selinux automatically? [No]?
* What is the path of the openssl binary? [/usr/bin/openssl]
Exemple pour vérifier si le serveur fonctionne correctement.
xtctl status
Extensive Testing is running
Le serveur est accessible à l’adresse indiquée à la fin de l’installation. Il est possible d’utiliser les comptes par défaut pour se connecter:
- utilisateur
admin- utilisateur
tester- utilisateur
monitor
Note
Les comptes par défaut n’ont pas de mot de passe.
Avertissement
Ne pas oublier de changer les mots de passe des comptes par défaut ou de désactiver les comptes.
Installation depuis les sources
Avertissement
Ce mode d’installation n’est recommandé que pour les utilisateurs avancés.
Il faut dans un premier temps installer les libraries systèmes et python nécessaire au bon fonctionnement du programme, la liste complète est disponible dans la chapitre contribution.
Après voir récupérer les sources depuis github il faut recomposer les différents répertoire
| core-server | /opt/xtc/vXXX |
| plugins-adapters | </opt..>/SutAdapters/vXXX |
| plugins-libraries | </opt..>/SutLibraries/vXXX |
| test-interop | </opt..>/TestInterop/ |
| test-library | </opt..>/TestExecutorLib/ |
| web-client | </opt..>/Web |
Préparation de la base de donnée
Pour initialiser la base de donnée, il faut exécuter le scripts « add-bdd.py » disponible dans le répertoire Scripts/database.
Démarrage du serveur
Il faut exécuter le scripts python run disponible à la racine du répertoire /opt/xtc/vXXX/.
Mise à jour
La mise à jour du serveur est possible en exécutant le script ./update.sh
Les anciens tests, adaptateurs et utilisateurs sont automatiquement migrés.
Note
La mise à jour est refusée si aucune version du produit n’est détectée.
Retour arrière
Le retour arrière est possible vers les versions antérieures déjà installées sur le serveur.
Exécuter le script rollback.sh avec la version précédente.
./rollback.sh X.X.X
=====================================================
=  - Rollback of the ExtensiveAutomation product -  =
=                 Denis Machard                     =
=            www.extensiveautomation.org            =
=====================================================
* Detecting the operating system                           [  OK  ]
* Detecting the system architecture                        [  OK  ]
* Stopping the ExtensiveAutomation server                  [  OK  ]
* Rollbacking to ExtensiveAutomation-X.X.X                 [  OK  ]
* Restarting the ExtensiveAutomation server                [  OK  ]
=========================================================================
- Rollback completed successfully!
=========================================================================
Désinstallation
La désinstallation du produit peut se faire en utilisant le script ./uninstall.sh présent dans le paquet d’installation.
./uninstall.sh
======================================================
=  - Uninstall of the ExtensiveAutomation product -  =
=                 Denis Machard                      =
=            www.extensiveautomation.org             =
======================================================
* Detecting the operating system                           [  OK  ]
* Detecting the system architecture                        [  OK  ]
* Stopping the ExtensiveAutomation server                  [  OK  ]
* Stopping httpd                                           [  OK  ]
* Removing the ExtensiveAutomation database                [  OK  ]
* Removing the ExtensiveAutomation source                  [  OK  ]
* Removing the ExtensiveAutomation service                 [  OK  ]
* Removing ExtensiveAutomation user                        [  OK  ]
* Restoring php                                            [  OK  ]
* Removing httpd configuration                             [  OK  ]
* Restarting httpd                                         [  OK  ]
=========================================================================
- Uninstallation completed successfully!
=========================================================================
Note
Il est possible d’utiliser le mode force en cas d’erreur durant la désinstallation.
Client
Installation Windows
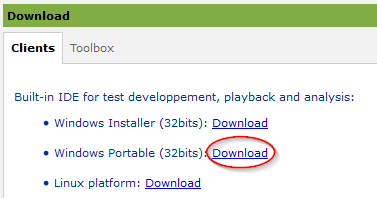
- Il existe 2 modes d’installation:
- mode portable (version recommandée)
- mode installation
Le client peut être récupéré depuis le site internet https://www.extensiveautomation.org ou bien depuis le serveur de test.
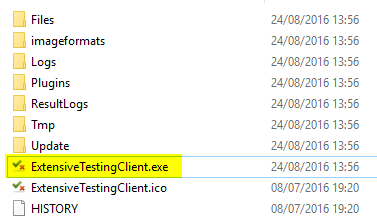
Ensuite il faut le décompresser et exécuter le fichier ExtensiveAutomationClient.exe
Installation Linux
Il n’y a pas de version pré-compilée pour Linux. Il faut récupérer les sources depuis github, installer les paquets manquants et exécuter le fichier suivant
python Main.py
Mise à jour
La mise à jour du client est possible en mode automatique (si présent sur le serveur) ou manuel. Depuis le client lourd il est possible de vérifier la présence d’une mise à jour.
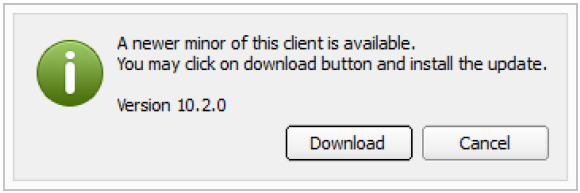
Note
Si la version proposée est une version majeure alors la mise à jour est obligatoire.
Boîte à outils
Installation Windows
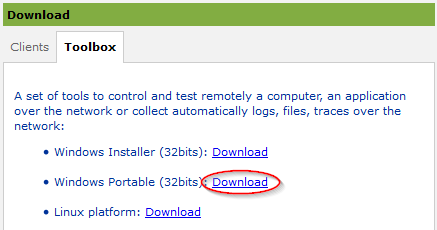
- Il existe 2 modes d’installation:
- mode portable (version recommandée)
- mode installation
La boîte à outils peut être récupérée depuis le site internet https://www.extensiveautomation.org ou bien depuis le serveur de test.
Ensuite il faut le décompresser et exécuter le fichier ExtensiveAutomationToolbox.exe
Installation Linux
La boîte à outils peut être récupérée depuis le site internet https://www.extensiveautomation.org ou bien depuis le serveur de test. 2 scripts sont disponibles pour démarrer un agent ou une sonde.
- ./toolagent
- ./toolprobe
./toolagent
Command line tool launcher

Usage: ./toolagent [test-server-ip] [test-server-port] [ssl-support] [ftp|sikulix|socket|dummy|
database|selenium|gateway-sms|command|soapui|file|adb|ssh] [tool-name]
[tool-description] [[proxy-ip] [proxy-port]]

* Server parameters
[test-server-ip]: your test server ip or hostname. This option is mandatory.
[test-server-port]: your test server port. This option is mandatory.
[ssl-support=True/False]: ssl support. This option is mandatory.

* Tools parameters
[Values expected: ftp|sikulix|socket|dummy|database|selenium|gateway-sms|
command|soapui|file|adb|ssh]: tool type to start. This option is mandatory.
[tool-name]: The tool name. This option is mandatory.
[tool-description]: The tool description. This option is mandatory.

* Proxy parameters
[proxy-ip]: proxy address. This option is optional.
[proxy-port]: proxy port. This option is optional.
./toolprobe
Command line tool launcher

Usage: ./toolprobe [test-server-ip] [test-server-port] [ssl-support] [dummy|textual|network|
file] [tool-name] [tool-description] [[proxy-ip] [proxy-port]]

* Server parameters
[test-server-ip]: your test server ip or hostname. This option is mandatory.
[test-server-port]: your test server port. This option is mandatory.
[ssl-support=True/False]: ssl support. This option is mandatory.

* Tools parameters
[Values expected: dummy|textual|network|file]: tool type to start. This option is mandatory.
[tool-name]: The tool name. This option is mandatory.
[tool-description]: The tool description. This option is mandatory.

* Proxy parameters
[proxy-ip]: proxy address. This option is optional.
[proxy-port]: proxy port. This option is optional.
Mise à jour
La mise à jour de la boîte à outils est à faire manuellement. Il faut récupérer le paquet depuis le site internet ou bien depuis le serveur de test.
- La mise à jour nécessite:
- de supprimer la version courante
- d’ajouter la nouvelle version et reconfigurer les agents ou sondes à redémarrer.
Note
La mise à jour automatique n’est pas encore supportée.