Installation
Server
Automatic mode
Warning
- Basic configuration to respect before starting the installation:
- the network interface is correctly configured on the server
- access to official repositories is available
- using a Linux CentOS 7 or equivalent RedHat system
Installation of the solution can be done using the install.sh script in the tar.gz.
If the prerequisites are respected then the installation will be done in automatic mode, that is to say that the missing packets
will be recovered automatically.
Example of installation in automatic mode
./install.sh
Are you sure to install the product? (yes or no) yes
=========================================================
=  - Installation of the ExtensiveAutomation product -  =
=                    Denis Machard                      =
=               www.extensiveautomation.org             =
=========================================================
* Detecting the operating system (centos 7)                [  OK  ]
* Detecting the system architecture (x86_64)               [  OK  ]
* Detecting Perl, Python                                   [  OK  ]
* Detecting primary network address (XXX.XXX.XXX.XXX)      [  OK  ]
* Adding external libraries .................              [  OK  ]
* Adding external libraries .......                        [  OK  ]
* Adding interop libraries .......                         [  OK  ]
* Detecting Apache                                         [  OK  ]
* Detecting MySQL/MariaDB                                  [  OK  ]
* Detecting Postfix                                        [  OK  ]
* Detecting Openssl                                        [  OK  ]
* Detecting Php                                            [  OK  ]
* Copying source files                                     [  OK  ]
* Adding startup service                                   [  OK  ]
* Updating configuration files                             [  OK  ]
* Creating extensivetesting user                           [  OK  ]
* Updating folders rights                                  [  OK  ]
* Updating php configuration                               [  OK  ]
* Updating httpd configuration                             [  OK  ]
* Adding virtual host                                      [  OK  ]
* Restarting httpd                                         [  OK  ]
* Restarting MySQL/MariaDB                                 [  OK  ]
* Restarting postfix                                       [  OK  ]
* Adding the ExtensiveAutomation database                  [  OK  ]
* Starting ExtensiveAutomation X.X.X                       [  OK  ]
=========================================================================
- Installation completed successfully!
- Continue and go to the web interface (https://XXX.XXX.XXX.XXX/web/index.php)
=========================================================================
Example to check if the server is working properly.
xtctl status
Extensive Testing is running
The server is accessible at the address indicated at the end of the installation. It is possible to use no fault accounts to connect:
- user
admin- user
test- user
monitor
Note
The default accounts do not have a password.
Warning
Do not forget to change the default account passwords or disable the accounts.
Custom mode
Warning
This installation mode is only recommended for advanced users.
This mode is used to change the destination of the installation or to specify certain parameters (see the example).
Example of installation in custom mode (here, the destination of xtc)
./custom.sh
=========================================================
=  - Installation of the ExtensiveAutomation product -  =
=                    Denis Machard                      =
=               www.extensiveautomation.org             =
=========================================================
* Detecting the operating system (XXXXXXXX)                [  OK  ]
* Detecting the system architecture (XXXXXX)               [  OK  ]
* Detecting Perl, Python                                   [  OK  ]
* Detecting primary network address (XX.XX.XX.XX)          [  OK  ]
* Download automatically all missing packages? [Yes]
* In which directory do you want to install the ExtensiveTesting product? [/opt/xtc/] <INSTALL_PATH>
* What is the directory that contains the init scripts? [/etc/init.d/]
* What is the external ip of your server? <IP_EXTERNE>
* What is the FQDN associated to the external ip of your server? <FQDN>
* What is the database name? [xtcXXX]
* What is the table prefix? [xtc]
* What is the ip of your mysql/mariadb server? [127.0.0.1] <IP_BASE>
* What is the login to connect to your mysql/mariadb server? [root] <LOGIN_BASE>
* What is the password of previous user to connect to your mysql/mariadb server? [] <MOTDEPASSE_BASE>
* What is the sock file of your mysql/mariadb server? [/var/lib/mysql/mysql.sock]
* Do you want to configure iptables automatically? [Yes]?
* Do you want to configure php automatically? [Yes]?
* Where is your php conf file? [/etc/php.ini]
* Do you want to configure apache automatically? [Yes]?
* What is the directory that contains the httpd conf file? [/etc/httpd/conf/]
* What is the directory that contains the httpd virtual host conf files? [/etc/httpd/conf.d/]
* What is the directory that contains the virtual host? [/var/www/]
* Do you want to configure selinux automatically? [No]?
* What is the path of the openssl binary? [/usr/bin/openssl]
Example to check if the server is working properly.
xtctl status
Extensive Testing is running
The server is accessible at the address indicated at the end of the installation. It is possible to use the default accounts to log in:
- user
admin- user
test- user
monitor
Note
The default accounts do not have a password.
Warning
Do not forget to change the default account passwords or disable the accounts.
From sources
Warning
This installation mode is only recommended for advanced users.
First, you need to install the system and python libraries necessary for the proper functioning of the program, the complete list is available in the contribution chapter.
After retrieving the sources from github you have to recompose the different directories
| core-server | /opt/xtc/vXXX |
| plugins-adapters | </opt..>/SutAdapters/vXXX |
| plugins-libraries | </opt..>/SutLibraries/vXXX |
| test-interop | </opt..>/TestInterop/ |
| test-library | </opt..>/TestExecutorLib/ |
| web-client | </opt..>/Web |
Preparation of the database
To initialize the database, execute the “add-bdd.py” scripts available in the /Scripts/database directory.
Starting the server
Run the python run scripts available at the root of the /opt/xtc/vXXX/ directory.
Update
The server update is possible by running the script ./Update.sh
Old tests, adapters and users are automatically migrated.
Note
The update is refused if no version of the product is detected.
Rollback
Backtracking is possible to earlier versions already installed on the server.
Run the rollback.sh script with the previous version.
./rollback.sh X.X.X
=====================================================
=  - Rollback of the ExtensiveAutomation product -  =
=                 Denis Machard                     =
=            www.extensiveautomation.org            =
=====================================================
* Detecting the operating system                           [  OK  ]
* Detecting the system architecture                        [  OK  ]
* Stopping the ExtensiveAutomation server                  [  OK  ]
* Rollbacking to ExtensiveAutomation-X.X.X                 [  OK  ]
* Restarting the ExtensiveAutomation server                [  OK  ]
=========================================================================
- Rollback completed successfully!
=========================================================================
Uninstall
Uninstalling the product can be done using the ./Uninstall.sh script in the installation package.
./uninstall.sh
======================================================
=  - Uninstall of the ExtensiveAutomation product -  =
=                 Denis Machard                      =
=            www.extensiveautomation.org             =
======================================================
* Detecting the operating system                           [  OK  ]
* Detecting the system architecture                        [  OK  ]
* Stopping the ExtensiveAutomation server                  [  OK  ]
* Stopping httpd                                           [  OK  ]
* Removing the ExtensiveAutomation database                [  OK  ]
* Removing the ExtensiveAutomation source                  [  OK  ]
* Removing the ExtensiveAutomation service                 [  OK  ]
* Removing ExtensiveAutomation user                        [  OK  ]
* Restoring php                                            [  OK  ]
* Removing httpd configuration                             [  OK  ]
* Restarting httpd                                         [  OK  ]
=========================================================================
- Uninstallation completed successfully!
=========================================================================
Note
It is possible to use the force mode if an error occurs during the uninstallation.
Client
Windows Installation
- There are 2 installation modes:
- portable mode (recommended version)
- installation mode
The client can be retrieved from the website https://www.extensiveautomation.org or from the test server.

Then you have to unzip it and run the ExtensiveAutomationClient.exe file

Linux Installation
There is no pre-compiled version for Linux. It is necessary to recover the sources since github, to install the missing packets and to execute the following file
python Main.py
Update
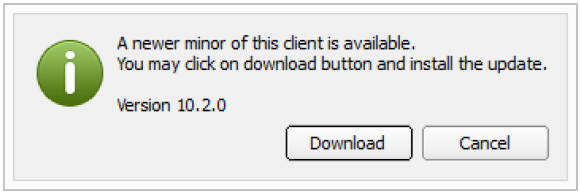
The update of the client is possible in automatic mode (if present on the server) or manual. From the client it is possible to verify the presence of an update.
Note
If the proposed version is a major release then the update is mandatory.
Toolbox
Windows Installation
- There are 2 installation modes:
- portable mode (recommended version)
- installation mode
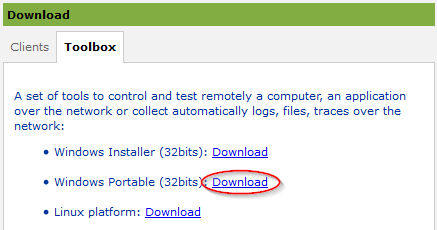
The toolbox can be retrieved from the website https://www.extensiveautomation.org or from the test server.
Then you have to decompress it and run the ExtensiveAutomationToolbox.exe file
Linux Installation
The toolbox can be retrieved from the website https://www.extensiveautomation.org or from the test server. 2 scripts are available to start an agent or probe.
- ./toolagent
- ./toolprobe
./toolagent
Command line tool launcher

Usage: ./toolagent [test-server-ip] [test-server-port] [ssl-support] [ftp|sikulix|socket|dummy|
database|selenium|gateway-sms|command|soapui|file|adb|ssh] [tool-name]
[tool-description] [[proxy-ip] [proxy-port]]

* Server parameters
[test-server-ip]: your test server ip or hostname. This option is mandatory.
[test-server-port]: your test server port. This option is mandatory.
[ssl-support=True/False]: ssl support. This option is mandatory.

* Tools parameters
[Values expected: ftp|sikulix|socket|dummy|database|selenium|gateway-sms|
command|soapui|file|adb|ssh]: tool type to start. This option is mandatory.
[tool-name]: The tool name. This option is mandatory.
[tool-description]: The tool description. This option is mandatory.

* Proxy parameters
[proxy-ip]: proxy address. This option is optional.
[proxy-port]: proxy port. This option is optional.
./toolprobe
Command line tool launcher

Usage: ./toolprobe [test-server-ip] [test-server-port] [ssl-support] [dummy|textual|network|
file] [tool-name] [tool-description] [[proxy-ip] [proxy-port]]

* Server parameters
[test-server-ip]: your test server ip or hostname. This option is mandatory.
[test-server-port]: your test server port. This option is mandatory.
[ssl-support=True/False]: ssl support. This option is mandatory.

* Tools parameters
[Values expected: dummy|textual|network|file]: tool type to start. This option is mandatory.
[tool-name]: The tool name. This option is mandatory.
[tool-description]: The tool description. This option is mandatory.

* Proxy parameters
[proxy-ip]: proxy address. This option is optional.
[proxy-port]: proxy port. This option is optional.
Update
The update of the toolbox is to be done manually. You have to get the package from the website or from the test server.
- The update requires:
- delete the current version
- add the new version and reconfigure the agents or probes to restart.
Note
The automatic update is not supported yet.