Contributions
Solution development
Graphic client
Environment x64 win py3.6 qt5
Tip
Recommended environment.
- To prepare its development environment, it is necessary to recover and install the following software:
- Python 3.6.3 64bits
- Git-2.15.0-64-bit.exe
- TortoiseGit-2.5.0.0-64bit.msi
- InnoSetup 5.5.9 - http://www.jrsoftware.org/isdl.php
Add additional Python packages with the pip command
> py -m pip install pyinstaller pylint
> py -m pip install pyqt5
> py -m pip install qscintilla
And retrieve the sources of the client since the deposit on github.
python Main.py
Warning
Windows XP is not supported in this mode.
x64 environment win py3.4 qt4
Warning
This development environment is no longer recommended.
- To prepare its development environment, it is necessary to recover and install the following software:
- Python 3.4.4 64bits
- PyQt 4.11.4
- Git-2.15.0-64-bit.exe
- TortoiseGit-2.5.0.0-64bit.msi
- InnoSetup 5.5.9 - http://www.jrsoftware.org/isdl.php
Install additional Python packages with the pip command
> C:\Windows\system32>py -3.4 -m pip install py2exe Cx_Freeze pyinstaller pylint
Warning
A update must be done in the py2exe library. Edit the C:Python34Libsite-packagespy2exeicons.py file Look for the if iconheader.idCount line and change the value 10 to 14.
Environment x64 centos py2.7 qt4
Preparation of the development environment on a Linux CentOS 6 or 7 system.
yum install epel-release PyQt4 python-test
yum install PyQt4-webkit qscintilla-python
yum install python-pip
yum install PyQt4-devel
pip install dpkt
pip install cx_freeze
Download the client’s sources from the deposit on github.
cd Scripts/qt4/
bash MakeResources.sh
Building files resources...
bash MakeTranslations.sh
Building translations resources...
cd ../..
python Main.py
x64 environment ubuntu py3.5 qt5
Preparing your development environment on a Ubuntu 17.04 Linux system
sudo apt-get –y install python3-pyqt5
sudo apt-get –y install python3-pyqt5.qsci
sudo apt-get –y install python3-pyqt5.qtwebengine
sudo apt-get –y install pyqt5-dev-tools
sudo pip install dpkt
Retrieve the client’s sources from the github repository.
cd Scripts/qt5/
chmod +x MakeResources.sh MakeTranslations.sh
bash MakeResources.sh
Building files resources...
bash MakeTranslations.sh
Building translations resources...
cd ../..
python3 Main.py
Toolbox
Environment x64 win py3.6 qt5 (recommended)
- To prepare its development environment, it is necessary to recover and install the following software:
- Python 3.6.3 64bits
- Git-2.15.0-64-bit.exe
- TortoiseGit-2.5.0.0-64bit.msi
- InnoSetup 5.5.9 - http://www.jrsoftware.org/isdl.php
> py -m pip install pyinstaller pylint
> py -m pip install pyqt5
> py -m pip install qscintilla
Install the libraries used by the different agents:
> py -3.6 -m pip install Cx_Freeze py2exe pyinstaller pylint
> py -3.6 -m pip install requests PyMySQL psycopg2 paramiko
> py -3.6 -m pip install pymssql-2.1.3-cp36-cp36m-win_amd64.whl
Install the dedicated selenium library for the solution:
> c:\Python36\python.exe setup.py install
x64 environment win py3.4 qt4
- To prepare its development environment, it is necessary to retrieve and install the following packages:
- Python 3.4.4 64bits
- PyQt 4.11.4
- Git-2.15.0-64-bit.exe
- TortoiseGit-2.5.0.0-64bit.msi
- InnoSetup 5.5.9 - http://www.jrsoftware.org/isdl.php
Install the libraries used by the different agents:
> py -3.4 -m pip install Cx_Freeze py2exe pylint
    > py -3.4 -m pip install requests PyMySQL psycopg2 pymssql paramiko
Install the dedicated selenium library for the solution:
> c:\Python34\python.exe setup.py install
Environment x64 centos py3.5 qt5
Preparation of its development environment on a Linux CentOS 6 or 7 system.
Install the Qt5 library (binding python)
sudo apt-get –y install python3-pyqt5
sudo apt-get –y install pyqt5-dev-tools
cd Scripts/qt5/
chmod +x MakeResources.sh MakeTranslations.sh
bash MakeResources.sh
Building files resources...
bash MakeTranslations.sh
Building translations resources...
cd ../..
Install additional libraries
sudo apt install python3-pip
pip3 install pyinstaller py2exe pylint
pip3 install paramiko requests
pip3 install PyMySQL psycopg2
pip3 install pymssql
unzip selenium-3.7.0-extensivetesting.zip
cd selenium-3.7.0/
sudo python3 setup.py install
Retrieve the client’s sources from the github repository.
Running the toolbox in graphical mode
python3 Systray.py
Environment x64 centos py2.7 qt4
Preparation of its development environment on a Linux CentOS 6 or 7 system.
Install additional libraries
yum install python-test
yum install python-pip
pip install pyinstaller py2exe pylint
pip install paramiko requests
pip install PyMySQL psycopg2
pip install pymssql
unzip selenium-3.7.0-extensivetesting.zip
cd selenium-3.7.0/
python setup.py install
Install the Qt4 library (binding python)
yum install epel-release PyQt4
yum install PyQt4-devel
cd Scripts/qt4/
chmod +x MakeResources.sh MakeTranslations.sh
bash MakeResources.sh
Building files resources...
bash MakeTranslations.sh
Building translations resources...
cd ../..
Retrieve the client’s sources from the github repository.
Running the toolbox in graphical mode
python Systray.py
Server
Environment x64 centos py2.7
Preparation of its development environment on a Linux CentOS 6.5 and above.
Installing system packages
vim
net-snmp-utils
unzip
zip
gmp
wget
curl
ntp
nmap
bind-utils
postfix
dos2unix
openssl
openssl-devel
tcpdump
mlocate
mariadb-server
mariadb
mariadb-devel
httpd
mod_ssl
php
php-mysql
php-gd
php-pear
python-lxml
MySQL-python
policycoreutils-python
python-setuptools
python-ldap
gcc
python-devel
Cython
java
git
libffi-devel
libpng-devel
libjpeg-devel
zlib-devel
freetype-devel
lcms-devel
tk-devel
tkinter
postgresql
postgresql-libs
postgresql-devel
Installing python libraries
six
appdirs
pyparsing
packaging
setuptools
httplib2
uuidlib
pycrypto
pyasn
ply
pysmi
pysnmp
freetds
setuptools_git
pymssql
ecdsa
pil
selenium
suds
requests
ntlm
kerberos
postgresql
xlrd
etxmlfile
jdcal
openxl
libpqxx
scandir
pycnic
xlwt
isodate
xml2dict
setuptools_scm
pytest
wcwidth
pyte
pysphere
pychef
idna
enum34
ipaddress
pycparser
cffi
orderddict
ntlm_auth
requests_ntlm
py_ntlm3
pywinrm
asn1crypto
cryptography
paramiko
jsonpath
wrapt
pbr
pytz
pyjenkins
snmap2
gitdb2
pygit
Plugins development
Adapter
Adding an adapter is done using the graphical client.
You have to go to the Modules Listing> Adapters repository and right-click on the tree to add an adapter.
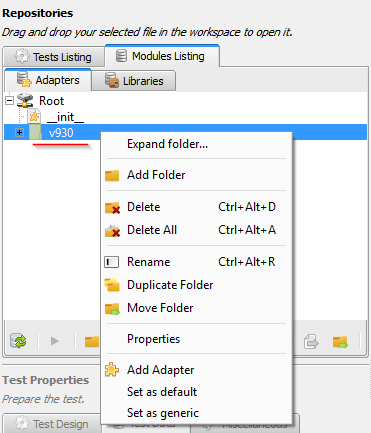
To make the adapter available for testing, you need to edit the __init __. Py file and add the lines
following:
import Example
__HELPER__.append("Example")
To make the adapter appear in the documentation accessible from the graphical client, it is necessary to
use the decorator @doc_public in front of the functions that one wishes to document.
class Example(TestAdapterLib.Adapter):
  @doc_public
      def __init__(self, parent)

  @doc_public
  def connect(self, timeout=5.0):
Tip
The Dummy adapter is to be used as a basis for development.
Libraries
Adding a library is done using the graphical client. You have to go to the Modules Listing> Libraries repository and right-click on the tree to add a library.
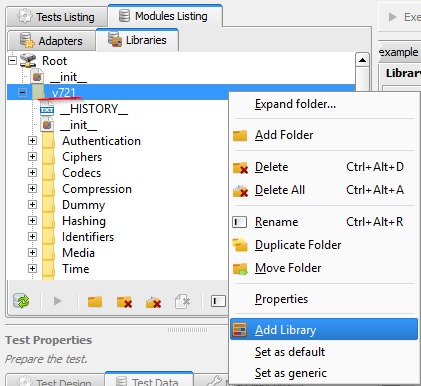
To make the library available for testing, you need to edit the __init __. Py file and add the lines
following:
import Example
__HELPER__.append("Example")
To make the library appear in the documentation accessible from the graphical client, it is necessary to
use the decorator @doc_public in front of the functions that one wishes to document.
class Example(TestLibraryLib.Library):
  @doc_public
      def __init__(self, parent)

  @doc_public
  def connect(self, timeout=5.0):
Tip
The Dummy library is to be used as a basis for development.
SDK Toolbox
Linux environment
Tip
It is recommended to use the dummy plugin as a basis for developing your agent or probe.
- Using as a basis the agent or probe
dummy, then: - update the variable
__TYPE__to indicate the name of the agent or the probe - change the name of the class with the name of your agent or probe.
- update the
__init__file to import your agent or probe.
- update the variable
Windows environment
The SDK for plugin creation is retrieved from github.
It is possible to copy the plugin Dummy and use it as a base.
The type and name of the plugin is to be configured in the config.json file
{
  "plugin": {
              "name": "MyExample",
              "version": "1.0.0"
              }
}
The author is defined in the MyPlugin.py file.
# name of the main developer
__AUTHOR__ = 'Denis Machard'
# email of the main developer
__EMAIL__ = 'd.machard@gmail.com'
Building the plugin in binary is done by calling the MakeExe3.bat script.
Customer SDK
- The client supports adding plugins. Creating a plugin requires:
- to use the SDK
- to define its type
List of possible plugins types:
| Type | Description |
| basic | Plugin to add a shortcut on the home page |
| recorder-app | Export/import data in the design wizard |
| recorder-web | Export/import data in the design wizard |
| recorder-framework | Export/import data in the design wizard |
| recorder-android | Export/import data in the design wizard |
| recorder-system | Export/import data in the design wizard |
| remote-tests | Export/import of data in remote tests |
| test-results | Exporting test results and reports |
The SDK for plugin creation is retrieved from github.
It is possible to copy the plugin Dummy and use it as a basis for development.
The type and name of the plugin is to be configured in the `` config.json`` file
{
  "plugin": {
              "name": "MyExample",
              "type": "recorder-app",
              "version": "1.0.0"
              }
}
The author is defined in the MyPlugin.py file.
# name of the main developer
__AUTHOR__ = 'Denis Machard'
# email of the main developer
__EMAIL__ = 'd.machard@gmail.com'
Building the plugin in binary is done by calling the MakeExe3.bat script.
The exchange of data between the plugin and the client is done with messages of JSON type.
Send data to the customer:
self.core().sendMessage( cmd='import', data = {"my message": "hello"} )Receiving data from the client:
class MainPage(QWidget):
   def insertData(self, data):
To facilitate troubleshooting, it is possible to add traces from the plugin.
- Add traces to the dedicated graphics window:
self.core().debug().addLogWarning("my warning message")
self.core().debug().addLogError( "my error message")
self.core().debug().addLogSuccess("my success message" )
- Add traces to log files:
Logger.instance().debug("my debug message")
Logger.instance().error("my error message")
Logger.instance().info("my info message")
Tip
It is possible to run the plugin without the client by activating the debug mode.
Documentation
The documentation is stored on github in the repository <https://github.com/ExtensiveAutomation/extensiveautomation.readthedocs.io> _. It is possible to contribute by applying for participation in the deposit.
The documentation is generated by the readthedocs <https://readthedocs.org/> _ service.